Want to show your appreciation?
Please a cup of tea.

Thursday, May 10, 2012

C# to Java–Access Modifiers

This is one of the informal discussions with a group undergoing the transition from C# to Java.

Assembly vs. .Jar File

.Net code need to be packed into an assembly to be useful. Java has no concept of this. Java’s runtime code unit is class file. The closest thing in Java as to the .Net assembly is a .jar file, which is merely a zip of a logically related group of class files. Metadata about the .jar file can also be pack in the .jar file. Hence, java has no version and assembly access scope.

Access Modifiers


C#

C# has four access modifiers: public, protected, internal and private.

protected and private modifiers are not applicable to top level types.

protected is only accessible by derived types.

The default access is internal for top level types, public for interface members, and private for everything else.

You can use both internal and protected, which gives you both access.

Java

Java has only three access modifiers: public, protected and private. But when you don’t give an access modifier, it means package access. Package access only allow classes defined in the same package to have access.

protected and private modifiers are not applicable to top level types which is same as .Net

protected gives package access plus accessible by derived classes.

The default is always package access in Java. But bear in mind that any body can define the same package name. So the access control is merely by convention and should be used as a security measure.

Sunday, February 12, 2012

Install Oracle 10g R2 32 bit Client and ODP.Net 10.2 on Windows 7

While the latest client is 11g, you’ll still need to install 10g R2 client before the infamous bug of ODP.Net 11.x is fixed.
Note: for x64 installation see here.

Install 32 bit Oracle 10g R2 client

This client installer only include ODP.Net for .Net 1.x framework. Download Oracle Database 10g Client Release 2 (10.2.0.3) (10203_vista_w2k8_x86_production_client.zip) from http://www.oracle.com/technetwork/database/10203vista-087538.html

Update (10/21/2012): What a pity that Oracle pulled off the page and download from their website. If you are still lucky, you can get a copy here: http://www.4shared.com/zip/ydP657yQ/10203_vista_w2k8_x86_productio.html

Unzip and run setup.exe in the install sub folder. Follow the instructions to install “Runtime” to a specific folder and give a name. I used
  • Name: OraClient10g_home32
  • Path: D:\oracle\product\10.2.0\client_32

Install 32 bit OPD.Net for .Net 2.0

Download Oracle 10g Release 2 ODAC (ODAC1020221.exe) from http://www.oracle.com/technetwork/database/windows/downloads/utilsoft-087491.html
Do not run the exe, instead use 7-zip or other zip utility to unzip it to a folder.
Go to the install sub folder in the unzip location.
Edit oraparam.ini file to add 6.1 to the end of certified windows version list, and save.
[Certified Versions]
#You can customise error message shown for failure, provide value for CERTIFIED_VERSION_FAILURE_MESSAGE
Windows=4.0,5.0,5.1,5.2,6.0,6.1
run the setup.exe file.
Select to install “Oracle Data Access Components 10.2.0.2.21”
In the “Specify Home Details” step, enter the path to the previously installed 32bit Client: D:\oracle\product\10.2.0\client_32
In the “Available Product Components”, select only “Oracle Data Provider for .Net 2.0 2.0.2.20”
Then take the default and finish installation.

32 bit assembly redirect

If you want existing assemblies that depends on older version of Oracle.DataAccess to use the this version, you need to add below assembly redirect to machine.config file under C:\Windows\Microsoft.NET\Framework\v2.0.50727\CONFIG for .Net 2.x-3.x and C:\Windows\Microsoft.NET\Framework\v4.0.30319\Config for .Net 4.x.
    <runtime>
        <assemblyBinding xmlns="urn:schemas-microsoft-com:asm.v1">
            <dependentAssembly>
                <assemblyIdentity name="Oracle.DataAccess" publicKeyToken="89b483f429c47342" culture="neutral" />
                <bindingRedirect oldVersion="9.0.0.0-10.65535.65535.65535" newVersion="2.102.2.20"/>
            </dependentAssembly>
        </assemblyBinding>
    </runtime>

Wednesday, February 08, 2012

Install Oracle 10g R2 Client and ODP.Net 10.2 on Windows 7 64bit

11g is the only official ODP.Net on Windows 7 64bit. But we’ll still need 10g R2 client before 11g’s infamous bug is fixed.

64bit Client

Download Oracle Database 10g Client Release 2 (10.2.0.4) (10204_vista_w2k8_x64_production_client.zip) from http://www.oracle.com/technetwork/database/10204-winx64-vista-win2k8-082253.html

Update (10/21/2012): What a pity that Oracle actually pulled off the page and download. If you a lucky, you can find a copy here: http://www.4shared.com/zip/naYhO1uh/10204_vista_w2k8_x64_productio.html

unzip and open Command Prompt and change directory to the unzipped location. run:
setup.exe –ignoreSysPrereqs

Note: If you still got OS version error when starting the setup. Edit install\oraparam.ini file to add 6.1 to the end of certified windows version list, and save. Then just run setup.exe without parameter.
[Certified Versions]
#You can customise error message shown for failure, provide value for CERTIFIED_VERSION_FAILURE_MESSAGE
Windows=4.0,5.0,5.1,5.2,6.0,6.1
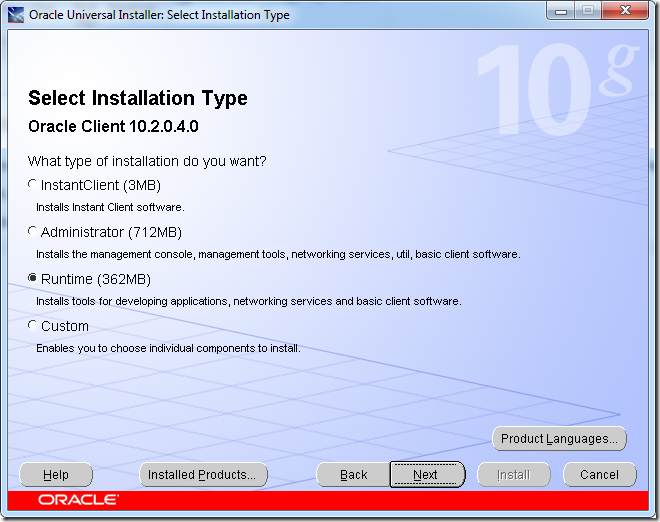
Select “Runtime” for installation type
w710g-installation-type
Change the installation location to where you wish and continue with default options to finish installation.
This comes with Oracle.DataAccess 2.102.4.0 for x64 platform. If you want existing assemblies that depends on older version of Oracle.DataAccess to use the this version, you need to add below assembly redirect to machine.config file under C:\Windows\Microsoft.NET\Framework64\v2.0.50727\CONFIG for .Net 2.x-3.x and C:\Windows\Microsoft.NET\Framework64\v4.0.30319\Config for .Net 4.x
   <runtime>
      <assemblyBinding xmlns="urn:schemas-microsoft-com:asm.v1">
       <dependentAssembly>
         <assemblyIdentity name="Oracle.DataAccess" publicKeyToken="89b483f429c47342" culture="neutral" />
         <bindingRedirect oldVersion="9.0.0.0-10.65535.65535.65535" newVersion="2.102.4.0"/>
       </dependentAssembly>
      </assemblyBinding>
   </runtime>

32bit Client

If you want to run 32-bit .Net application that uses ODP.Net, you’ll have to install 32bit client as well. One of such application is Visual Studio’s build in development web server – Cassini.
Note: there are workarounds running development web server in 64-bit.

Install 32 bit Oracle 10g R2 client and ODP.Net 10.2

Following the instructions here.

Fix the PATH

After both x64 and x86 version of clients are installed, Oracle sets both versions of bin folder to PATH. This could be an issue for either 64bit or 32bit application depends on the order of clients installed. To fix this problem, follow the instructions here: http://realfiction.net/go/153. That page was for 11g but the concept applies to 10g installation as well.

Saturday, January 21, 2012

Cobertura and Eclipse (eCobertura)

Introduction

Cobertura is a free Java tool that calculates the percentage of code accessed by tests. It can be used to identify which parts of your Java program are lacking test coverage. It is widely used in the continuous integration process to ensure the unit test was written to exercise the application code. Developer should also run the code coverage on the development environment to make sure there is enough code coverage before commit the changes into center source repository.

Eclipse Integration

The most convenient way to use Cobertura is to run it right in the Eclipse IDE using eCobertura (Eclipse Plugin for Cobertura). eCobertura enables you to launch your applications or tests in Cobertura-covered mode directly from within Eclipse. View your source files colored according to the coverage results. Browse through the detailed coverage results in a tree view.

Install eCobertura

Use Eclipse menu item “Help->Install New Softwre…” to install the plugin from the location indicated below.

Note For detailed instruction of how to install Eclipse plugins, please refer to General Installation Instructions section of Install Eclipse and Commonly Used Plugin page.

Work with URL: http://ecobertura.johoop.de/update/
Features to be selected to install:

  • eCobertura Code Coverage
    • eCobertura

NOTE: If you are trying to install on Kepler, please see the workaround in the end of this post

Run Coverage

You can run your applications or tests in Cobertura-covered mode in different ways. We’ll discuss a few of them but our main focus is to show you how to run the JUnit test with eCobertura. Running as application or with a different test framework is similar but will not be discussed here.
You start by selecting an application, a package, a test class, or a test method in the package explorer, the source editor, or anywhere that JUnit test can run. Then use toolbar button, context menu, or “Run” menu item to run the coverage.

Example 1, use toolbar button’s pull down menu to run all JUnit tests of a project in Cobertura-covered mode. Using toolbar button is the most convenient way launch Cobertura. It maintains a list of recently executed coverage run so that you can access them quickly. You’ll find it is very handy to repeat your last coverage run by directly clicking on the button itself.
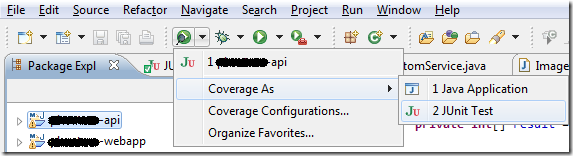
eCobertura-toolbar

Example 2, use context menu to run all JUnit tests of a selected package in Cobertura-covered mode.
eCobertura-contextmenu

Example 3, use “Run” menu to run all JUnit tests of a test class in Cobertura-covered mode. Using “Run” menu item maybe convenient for keyboard intensive users. The key sequence is Alt, R, C, then select a number (typically 1 or 2 depends on what you have selected).
eCobertura-menu

Check Coverage

After the coverage run, the detailed coverage result is presented in “Coverage Session View” window and coloring in the source editor.
Coverage Session View
The coverage session view let you browse through the detailed coverage results in a tree view. It displays the code coverage at both line and branch level for each class. Results of each class are summarized in subtitle for each package and grant total for all packages. You can double click on the classes in the tree view to jump to their respective source editors.
eCobertura-treeview
There are a few known issues with “Coverage Session View” windows, please follow the links to see a solution or workaround.
  1. The view is hidden by default. You need to show coverage session view upon first coverage run.
  2. The view isn’t automatically brought to front after every coverage run. Use shortcut key binding can ease the inconvenience.
  3. Coverage session view stops updating itself sometimes. Restart Eclipse when it happens.
Source code coloring
eCobertura also colors the source files according to the coverage result. Lines with green background are covered and those with pink background are not. For example,
eCobertura-textcolor
Note: eCobertura still cannot visualize branch coverage at this moment so you may need to run the Cobertura along and generate the html report if you must know the missing branch coverage.

Configuration

eCobertura often instruments much more classes than you intended to. Classes do not belong to current project, test classes and mocks add a lot of noise to the coverage result. eCobertura still has no smart way of detecting which class should be include/excluded. Hence, you’ll have to configure your coverage run to get a sensible aggregated percentage. Fortunately, you only need to do it once for reach project.
  1. Use toolbar button pull down or context menu to open “Coverage Configurations” dialog. 
    eCobertura-config
  2. Select the project in the left run tree. If you don’t see your project, you can add it manually or simple go back and run the coverage once for the project and come back here.
  3. Click on the Filters tab on the right and defined include/exclude filters according to your project. While exclude filters are usually always the same, you'll need one or more filters to include all the packages in your project.
  4. Click on Apply button and then close the dialog.

Known Issues

Show Coverage Session View
The “Coverage Session View” is hidden by default and you have to show it manually.
Show View For detailed instructions on how to show feature window, please refer to Access Feature Window section of Eclipse and Common Plugin Installation.
eCobertura-show-view-dialog
Shortcut key binding to show Coverage Session View
Version 0.9.8 of eCobertura doesn’t automatically bring the “Coverage Session View” window to front after coverage run. You’ll have to click on the Coverage Session View tab every time. Experienced user can ease the inconvenience by defining a shortcut key binding for show view command in preferences.
eCobertura-show-view-key
Coverage Session View stops updating

It is a known bug in version 0.9.8 of eCobertura that the “Coverage Session View” may sometimes stop updating itself after coverage run. You'll notice the issue when the execution time following the “All Packages” doesn’t update any more; and the tree remains opened from run to run. When this happens, the only known fix is to restart Eclipse.

Update (9/2/2012): I have now switched to EclEmma (not complete see 2nd update below). Don’t be fooled by the name. Emma is just the history, it no longer uses Emma. Instead, it uses JaCoCo coverage engine that can provide save level of granularity of coverage information but integrates with Eclipse much better than eCobertura. The only thing I have missed is the ability to see both line and branch coverage in the eCobertura’s coverage session view. EclEmma only allows you to see one at a time.

Update (4/16/2013): I'm actually using both, because of the EclEmma problems people mentioned below. Although I use EclEmma in most of time, but I still need eCobetura for edge cases and always run Cobertura on build server.

Install on Kepler

If you are using the Kepler version of eclipse, than the eCobertura won’t install because it is looking for an old version of JUnit.

Update (11/22/2013): There are two workarounds to this problem. You only need to do one of those.

  1. Instead of installing a new copy of Kepler. Try to upgrade from an old version of eclipse. I had Juno running with eCobertura installed. After upgrading to Kepler, the eCobertura still works faultlessly. The upgrade process was painless if you follow the instructions here. Actually it is such a good experience that I don’t have to re-install all the plugins that I had since Indigo.
  2. You need to copy a old JUnit plugin, get it from your old installation of eclipse like Indigo or Juno. Not sure which exactly version worked but I copied both org.junit4_4.8.1.v20120523-1257 and org.junit_4.10.0.v4_10_0_v20120426-0900 to the plugins directory and then you can install eCobertura.

Jenkins Build Status Monitoring

Introduction

Jenkins is an award-winning job monitor application focuses on the following two jobs:
  1. Jenkins provides an easy-to-use continuous integration system, making it easier for developers to integrate changes to the project, and making it easier for users to obtain a fresh build. The automated, continuous build increases the productivity.
  2. Monitoring executions of externally-run jobs, such as cron jobs and procmail jobs.
The detailed information of Jenkins is can be found on Jenkins website: http://jenkins-ci.org/.
In this documentation, we introduce two client side monitoring tools:
  • CCTray – Window based application that shows visual indication and notification of the build status of your projects.
  • Hudson Mylyn Connector – Integrates with Eclipse IDE to support for running and monitoring builds as well as inspecting the results.

CCTray

CCTray is part of CruiseControl build system. It’s a Windows system tray application that can be used to to provide the status and notification of build jobs in Jenkins.

Installation

CCTray can be downloaded from the CruiseControl.Net’s project download page. Latest release is CruiseControl.NET-CCTray-1.6.7981.1-Setup.exe when this is written.
It is recommended to start CCTray on Windows start up. This can be done by adding CCTray application link to the Startup folder of Windows start menu.
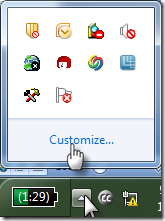
In Window 7, you may also want to make the CCTray icon always show. 
cctray-customize cctray-notification

Connect to Jenkins Server

  1. Click on tray icon to open the main CCTray window.
  2. Go to menu item “File->Settings…”
  3. Select “Build Projects” tab. Check on the projects that you want to monitor. If all your projects are listed. Click OK to complete the configuration. Otherwise, use “Add…” button and continue to next step.
    cctray-projects
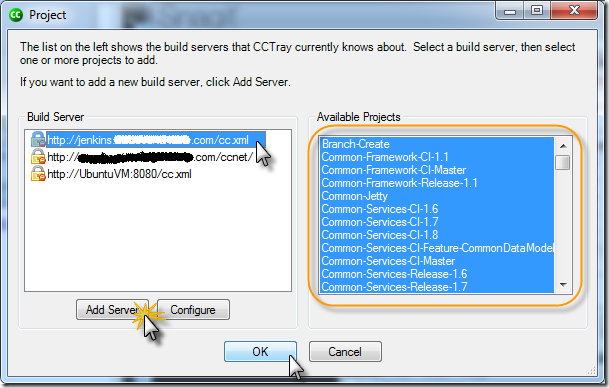
  4. In the “Project” dialog, select the build server where your project is on. Then select all available projects and click OK. Back to step 3 to complete your final selection of projects to monitor. If the your Jenkins server is not listed, click on “Add Server” button and continue to next step.
    cctray-available-projects
  5. In the “Build Server” dialog, select “Supply a custom HTTP URL” radio button. Enter URL http://jenkins.yourdomain.com/cc.xml in the text box. Then click on OK. Back to previous step to add all available projects.
    cctray-build-server

Status Update

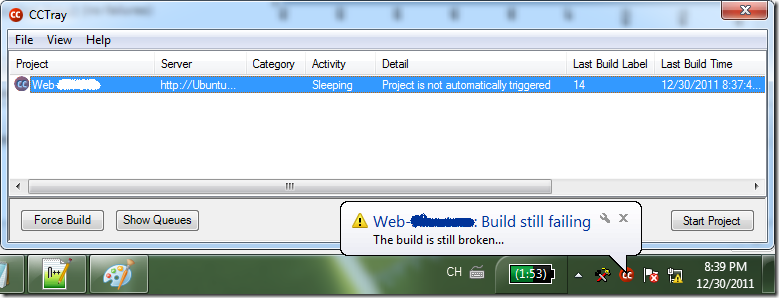
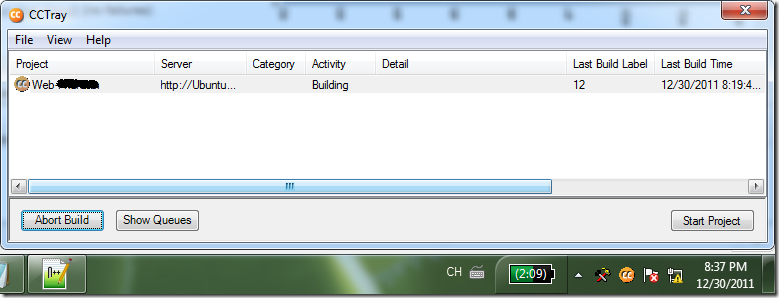
Once you have added your project, you should be able monitor your build status and receive notifications. You can also double click on the project to jump to the job page of Jenkins’ build server website. Below are some example screenshots show the status and notification.
cctray-failed
cctray-building
cctray-success

Known Issues

Due to the limit integration capability between CCTray and Jenkins server, job control features of CCTray won’t work. For example, you cannot start/stop Jenkins job from CCTray.

Mylyn Hudson Connector

Mylyn Hudson Connector is a connector for Mylyn Builds. This document helps you to install the connector and connect to your Jenkins build server.

Installation

Use Eclipse menu item “Help->Install New Softwre…” to install the plugin from the location indicated below.
Note For detailed instruction of how to install Eclipse plugins, please refer to General Installation Instructions section of Install Eclipse and Commonly Used Plugin page.
Work with URL: http://download.eclipse.org/mylyn/releases/indigo
Features to be selected to install:
  • Mylyn Integrations
    • Mylyn Builds Connector: Hudson/Jenkins (Incubation)

Add Build Server

  1. Make sure you can connect to your Jenkins server through browser.
  2. Open “Builds” window
    Show View For detailed instructions on how to show feature window, please refer to Access Feature Window section of Eclipse and Common Plugin Installation.
  3. Click on “New Build Server Location” toolbar button.
    jenkins-add-server
  4. In “New Repository” dialog, select “Hudson (supports Jenkins)” and click “Next >” button.
    jenkins-new-repo
  5. In “New Build Server” dialog,
    jenkins-new-server
    1. Enter server and label provided below.
    2. Unselect “Anonymous” checkbox, and enter your Jenkins user ID and password.
    3. Click on “Validate” button. If you entered the correct information, the Build Plans list box should be populated with available jobs on Jenkins server.
    4. Select the project(s) that you want to monitor and click “Finish” button.
  6. You build jobs should now appear in the builds window. You can always add more jobs to monitor using the property page of the build server you have just added.
    jenkins-properties

Configuration

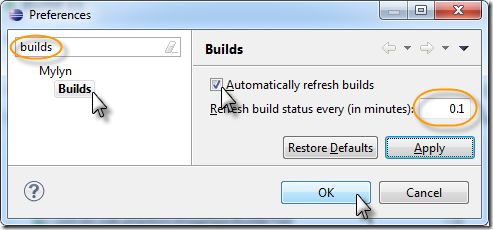
You can use Eclipse preference to automatically refresh the build status periodically.
jenkins-preferences

References

Reference links are provided for further reading of Mylyn and Jenkins integration.

Others

Friday, January 20, 2012

Jetty and Eclipse

Introduction

This page helps to setup Jetty as your local development server. I covers installation, configuration and manage the Jetty within Eclipse IDE.

Installation

Download the Jetty core component binary from the Jetty downloads page. Select the version that is required by your project. You can install multiple version of Jetty as long as you don’t run them on same port at the same time. Here are the direct links to recent Jetty versions:

Download the .zip (or .tar.gz preferable for Linux and OSX) file and decompress it. It will be extracted into a directory called jetty-distribution-VERSION. Put this directory into a convenient location. This location will be referred as either JETTY_HOME or as $(jetty.home) on Jetty Wiki.

Jetty Eclipse Plugin

Plugin Installation

Please refer to the Web Tools Platform section of Install Eclipse and Commonly Used Plugin page and make sure "WST Server Adapters" is installed.

Add Jetty Server

Follow the instructions below to add your Jetty server to Eclipse so you can manage the server and deploy web application within Eclipse IDE.

  1. Open “Servers” window.

    Show View For detailed instructions on how to show feature window, please refer to Access Feature Window section of Install Eclipse and Commonly Used Plugin.

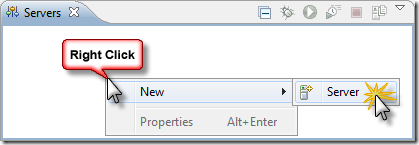
  2. Right click on the blank area of “Servers” window and select “New->Server” context menu.
    jetty-new-server
  3. Type “jetty” as the filter text. Select the “Jetty v#.# Server” where #.# should be the same version of Jetty server or one version lower if a match doesn’t exist. Then click “Next >” to continue.
    jetty-server-type
  4. Enter the home where the specific version of Jetty is installed, then click on “Finish”. You should see the newly added entry in the “Servers” window.
    jetty-server-dir

Deploy Web Application to Jetty Server

  1. Open “Servers” window.

    Show View For detailed instructions on how to show feature window, please refer to Access Feature Window section of Install Eclipse and Commonly Used Plugin.

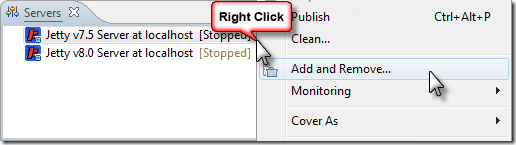
  2. Right click on the server to where the application will be deployed, then select “Add and Remove…” context menu item.
    jetty-add-remove-menu
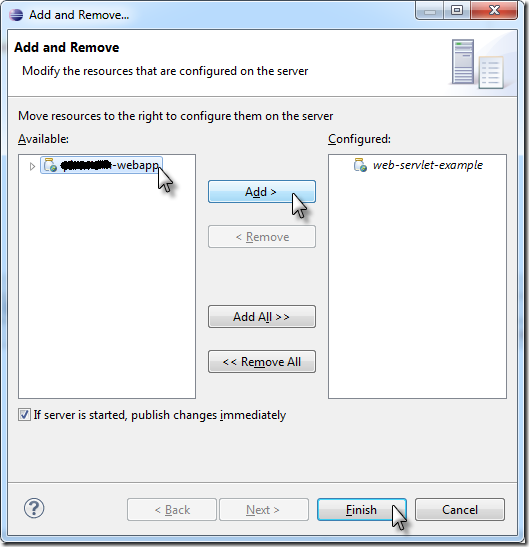
  3. Change the application(s) to deploy to the server using Add/remove buttons. Click on “Finish” button when you are done.
    jetty-add-webapp
  4. You should see the applications deployed are listed beneath the server. And you can start/stop/debug/profile the server using the toolbar buttons.
    jetty-add-webapp
  5. From the console, you can see the application is deployed and Jetty started successfully.
    jetty-console

Change Settings

Instructions below shows you how to adds environment variables and change module path. By going through those step, you can also get a general sense of how to change the settings of Jetty server in Eclipse.

  1. Open “Servers” window

    Show View
    For detailed instructions on how to show feature window, please refer to Access Feature Window section of Install Eclipse and Commonly Used Plugin.

  2. Double click on the server to open the server settings window.
    jetty-open-server
  3. You can use this window to change listening port and other properties. Then click on “Open launch configuration” link.
    jetty-settings
  4. In the “Edit launch configuration properties” dialog, make necessary changes to parameters start Jetty included environment variables. Then click “OK”.

    jetty-launch-env

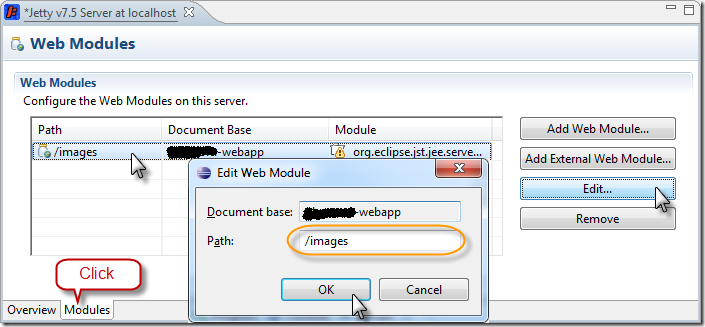
  5. When you are back to the server window, click on the "Modules" at the bottom, select the application module you want to edit and change the Path value according to your project documentation.
    jetty-edit-module
  6. Save your changes by using Eclipse menu item "File->Save".

Troubleshooting

Q: No permission to /var/log/jetty
A: This happens to OSX and Linux users. The fix is to create the log directory and give proper permission.

sudo mkdir -p /var/log/jetty/applogs
sudo mkdir -p /var/log/jetty/weblogs
sudo chmod -R a+w /var/log/jetty/*

Q: Address already in use
A: When you encounter below error when start Jetty:

WARN::FAILED SelectChannelConnector@0.0.0.0:80: java.net.BindException: Address already in use

There are two possible causes:

  1. The previous run instance wasn’t fully shutdown before the Jetty was restarted. This can be resolve by retrying again.
  2. Another application is using the same port. You must stop that conflicting application or have that application use a different port. To find out which application is using the port,
    • On Windows, TCPView is a great GUI tool for this purpose. You can also quickly find out using command line utility.
      To find out process ID (a short list):
      netstat -aonp TCP | find -i "listening"

      To find out process name (a long list):

      netstat -abnp TCP
    • On OSX and Linux, use below command.
      lsof -i

Maven and Its Eclipse Plugin

Introduction

Eclipse has Maven plugin that works without additional maven installation. Theoretically, if all your use of Maven is in eclipse, then there is no need to install standalone Maven. But when you encounter problem to build your project in Eclipse, a standalone Maven becomes handy to help isolate the issue.

Installation

Please follow the Maven Download and Installation instructions on Maven site. At the time of writing, Maven Eclipse plugin uses Maven 2.x, so it is recommended to download and install the latest Maven 2.x instead of 3.x.

JDK: Please be reminded that Maven requires JDK.

Maven Eclipse Plugin (m2e)

Plugin Installation

Please refer to Maven Integration (m2e) section of Install Eclipse and Commonly Used Plugin page.

Import Maven Project

We recommend you to build your Maven project one by standalone Maven before you import to Eclipse. Change directory to the root of your Maven project and run below command:

mvn clean package

Upon successful Maven build, continue to import projects into Eclipse by following the instructions below.

  1. Open Import dialog using Eclipse menu item “File->Import...”
  2. Type “maven” as filter text and select “Maven->Existing Maven Projects”. Then click “Next  >” to continue.
    maven-import
  3. Input directory path to the root of your maven project and press enter key, or use “Browse…” button. Each maven module will be listed in the “Projects” list box. Check the projects that you want to import and click “Finish” button.
    maven-import-projects
  4. The process may take some time to finish importing your project. Please wait for Eclipse to finish its work. Once it is complete, you should see all your imported projects in the Package Explorer. There should be a little blue M at the upper left corner of the project icon.
    maven-import-result

Further Reading