Want to show your appreciation?
Please a cup of tea.

Thursday, January 19, 2012

Atlassian Connector for Eclipse Mylyn

Introduction

The Atlassian Connector for Eclipse is based on the popular task-focused Mylyn interface for Eclipse. Developers with any Eclipse-based IDE can use it to receive notifications of changes to JIRA issues and create, update, comment and manage JIRA issues right within the IDE.

Installation

Use Eclipse menu item “Help->Install New Softwre…” to install the plugin from the location indicated below.

Note For detailed instruction of how to install Eclipse plugins, please refer to General Installation Instructions section of Install Eclipse and Commonly Used Plugin page.

Work with URL: http://update.atlassian.com/atlassian-eclipse-plugin/e3.7

Features to be selected to install:

  • Atlassian Connector
    • Atlassian Connector for Eclipse (Required)

Connecting to Jira

Add Jira Repository

  1. Open "Task Repositories" window.
    Show View For detailed instructions on how to show feature window, please refer to Access Feature Window section of Eclipse and Common Plugin Installation.

    atlassian-show-view

  2. In the Task Repositories window, click “Add Task Repository…” toolbar button to open “Add Task Repository” wizard. 
    atlassian-task-repo
  3. Select JIRA repository type and click “Next >” button. 
    atlassian-select-repo
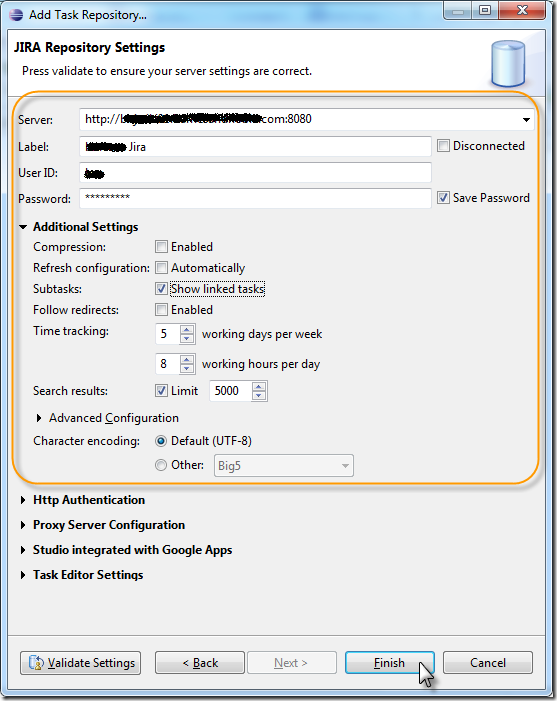
  4. Enter the repository settings. The server URL must be Jira repository URL. User ID and password must be your JIRA username and password. You can select other options according to your preference. For example, we can use “Jira” as the label that we’ll refer to in later stop 
    Warning
    make sure you use full URL so that the it can be resolved when you use VPN.
    Validate Settings
    you can validate your connectivity by using "Validate Settings" button before clicking on “Finish”. But if you choose to do so, make sure you follow the instruction in step 5a below.

    Click on “Finish” button after you made sure all the settings are correct (or validated by following instruction in step 5a below).
    atlassian-repo-setting

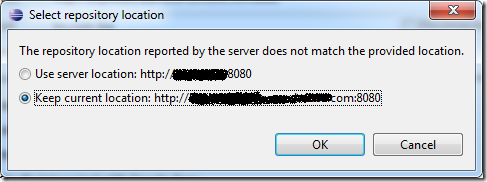
    1. This step is optional but if you are connected to the corporate network and able to access JIRA in your browser, it is a good idea to validate the settings by clicking on “Validate Settings” button. If the information you entered are correct but “Select repository location” dialog pops up, you most likely should select “Keep current location” option and click OK. 
      atlassian-repo-location
  5. The new task repository is now created, you will be prompted to create a query for the newly created task repository. Answer no to the question for now.

Add Jira Query

Once the Jira repository is added, you can add new query to load the Jira issues into Task List window. You can add multiple queries by repeating below steps.

  1. Make sure you can connect to your Jira server.
  2. Go to “Task List” window (don't be confused with “Tasks” window).
    Show View For detailed instructions on how to show feature window, please refer to Access Feature Window section of Eclipse and Common Plugin Installation.
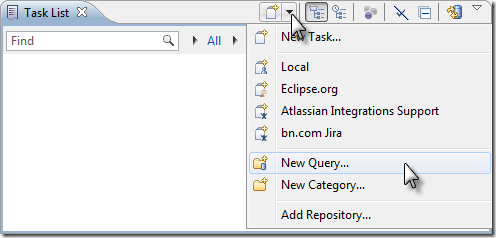
  3. Pull down “New Task” toolbar menu and select “New Query…” menu item. 
    task-new-query
  4. Select “Jira” repository that we created in previous section and click “Next >” button. 
    task-select-repo
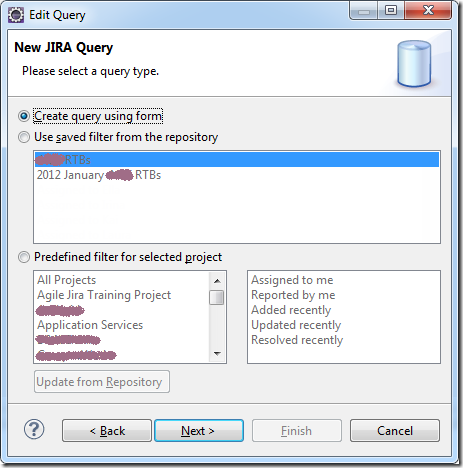
  5. In the “New Jira Query” dialog, select one of the three query type, 
    jira-query-type
    1. If you select “Create query using form”, click "Next >" button. Enter the Jira query parameters in the next dialog and click “Finish” button. 
      jira-query-parameter
    2. If you select “Use saved filter from the repository”, select one of the saved query and click “Finish” button.
      Tips You can go to your Jira website to create and save filters. Then click “Update from Repository” to show your newly created filters in the list box.

      jira-saved-filters
    3. If you select “Predefined filter from selected projects. Select one item in each list box and click “Finish” button.
  6. Eclipse will load Jira issues and show them in the “Task List” window grouped by the queries. 
    jira-issue-list
    To see the meaning of the different icons, use Task List window menu item “Show UI Legend...” 
    task-legend

Further Readings

Integration with EGit

You need to install "EGit Mylyn" by following the instructions in Git Integration (EGit) section on Install Eclipse and Commonly Used Plugin if you haven’t done so.

Open Corresponding Task

This function makes it very easy to (re)open Jira issues while browsing Git changes. Just pick a change and click this menu item, and the Jira issue that is associated with that change will be opened for you. This is supported for changes of a single file, for changes in a whole repository, for incoming and outgoing changes in Synchronize view, and basically in any type of History views. 
task-git-history 
task-opened-issue

Commit messages

This is a handy convenience function that helps you not to forget to associate your changes with the Jira issue you are working on. What it does, simply, is that when committing changes, the content of the commit message text box in the Commit dialog will be initialized to contain the issue ID of the currently active Jira issue, along with other released information.
task-egit

Wednesday, January 18, 2012

EGit Bootstrap

Note: Recently I wrote a series development bootstrap documents for our new Java project using Eclipse as primary development tool. Maybe useful to others.

Introduction

This page assumes you have basic understanding of Git. Please read Git Installation and Configuration to get familiar with Git version control system.

Installation

Please refer to the Git Integration (EGit) section of Eclipse and Common Plugin Installation page.

Configuration

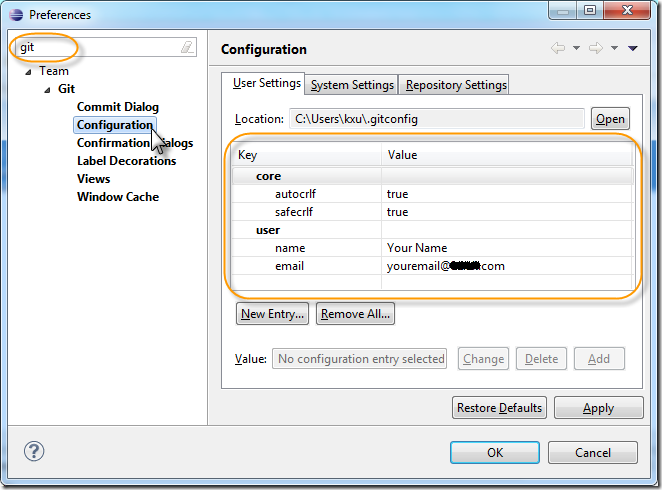
  1. In Eclipse, go to menu Windows -> Preferences. Enter the “git” as filter text.
  2. Select "Team->Git->Commit Dialog", uncheck Hard-wrap commit message and click on "Apply" button.
    egit-config-commit
  3. Select "Team->Git->Configuration". Add or change the key/value pairs accordingly (see warning for autocrlf value). Then click "Apply" button.
    Warning
    The value for core.autocrlf is different for different operating system. Please refer to EOL Handling section of Git Installation and Configuration page.

    egit-configuration

  4. If your have EGit 1.2 and above, select "Team->Git->Projects" and check "Auto share projects located in a git repository" option. Then click "Apply" button. If you don't enable this option, you'll need to manually share your projects .
    egit-config-share
  5. Replace text filter with "mylyn" and select "Mylyn->Team", change the "Commit Comment Template" to
     ${connector.task.prefix} ${task.key}: ${task.description}

    mylyn-config-commit

  6. Click "OK" to save the setting and close window.

Clone Repository

  1. Open “Git Repositories” window.
    Show View For detailed instructions on how to show feature window, please refer to Access Feature Window section of Eclipse and Common Plugin Installation.
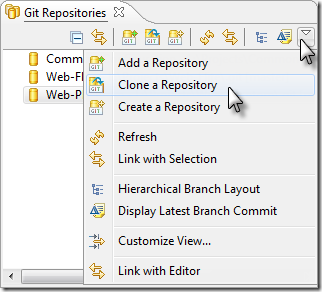
  2. Pull down Git Repository menu and click on select “Clone a Repository”.
    Tip: You can also use “Add a Repository” if you have already cloned repository using other Git client.

    egit-repo-menu

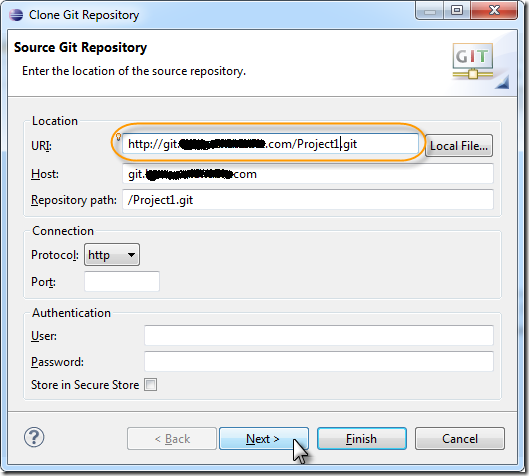
  3. Enter the source repository URI to clone. If you have saved password to netrc, you don’t need to enter password here. Otherwise you must enter authentication information and optionally save it to the secure store. Click "Next >" to move on.
    egit-clone-source
  4. Select all branch and click “Next >” button to continue.
    egit-clone-branch
  5. Enter (or Browse to) the local directory path and click “Finish” button.
    egit-clone-local

Share Project

You must share your project before you can use EGit to commit, pull and push changes. This section assumes that your projects are already in a Git repository. Follow the instructions below to enable Git operations for those projects.

  1. Go to "Project Explorer" window.
    Show View For detailed instructions on how to show feature window, please refer to Access Feature Window section of Eclipse and Common Plugin Installation.
  2. Select projects that you want to enable Git operations, then right click on one of them.
  3. Select the Team->Share Project content menu item.
    egit-share-project-menu
  4. Select Git repository type and continue.
    egit-share-project-type
  5. Check "Use or create repository in parent folder or project" checkbox, leave all projects selected and click on "Finish" button.
    egit-share-project-repo
  6. Now the project context menu "Team" is populated with EGit menu items.
    egit-full-context-menu

Git Installation and Configuration

Note: Recently I wrote a series development bootstrap documents for our new Java project using Eclipse as primary development tool. Maybe useful to others.

Introduction

Git is a distributed version control system designed to handle everything from small to very large projects with speed and efficiency.

Comparing to other version control systems that you may have used, the main difference is that Git doesn’t have a central repository. Every Git clone is a full-fledged repository with complete history and full revision tracking capabilities. Use git pull and git push commands to synchronize your local repository with any remote repository.

For typical corporate development use of the git, the release engineering’s repository is elected to be the central repository that everybody pulls from and eventually pushes to.

Installation

There are many different Git clients for each type of operating system platform. We’ll cover three major free tools.

  • Official Git command line utility
  • Eclipse plugin – Egit
  • TortoiseGit – Windows Explorer integrated Git graphical interface.

Git command line utility

The official Git command line utility can be downloaded from below locations. Please download and install the latest version - 1.7.9 at the time of writing.

Windows binary: http://code.google.com/p/msysgit/downloads/list?can=3

Mac OSX binary: http://code.google.com/p/git-osx-installer/downloads/list?can=3

Linux: use one of below for your favorite distribution:

sudo apt-get install git-core

or

sudo yum install git-core

For Windows installation, please take default option except in one screen below.
git-install

Eclipse plugin – EGit

Please refer to the Git Integration (EGit) section of Eclipse and Common Plugin Installation page.

TortoiseGit

You must install the Git command line utility first before you can install TortoiseGit. Download the Git from http://code.google.com/p/tortoisegit/downloads/list. Get the latest version, 1.7.6.0 at the time of writing, for your operating system's bit version.

Tip: How to determine whether a computer is running a 32-bit version or 64-bit version of the Windows operating system

Run the installer and take the default until you get to the screen below:
TortoiseGit-Install
If you don’t have TortoiseSvn installed, or you plan to use ToroiseGit more than ToroiseSvn, then make no change and take the default all the way to finish install. Otherwise, disable “Register diff/patch files” option and complete the installation.

Tip: If you use TortoiseGit, you should seriously consider JiraSVN. It adds Jira ticket column to the revision log screen; make ticket IDs in comments hyperlinks; warn you when ticket number is missing in commit comment; and let you search Jira ticket right in the commit dialog.

Configuration

Determine Home Folder on Windows

Git saves configuration information in user’s home directory. In Windows, the home folder is determined as below.

If HOME environment variable exists, value of the HOME environment variable is used as home folder, i.e. %HOME%. Otherwise, the home folder is defined by HOMEPATH environment variable on the drive defined by HOMEDRIVE, i.e. %HOMEDRIVE%%HOMEPATH%.

Save Password

To avoid typing your password again and again, it is a good idea to save your Git password in netrc file. Both command line utility and TortoiseGit reads username and password from netrc file.

For Unix, Linux and OSX, the file is named .netrc and located in your home directory, which is defined by the HOME environment variable. Depends on the type of shell you use, you should be able to access via

~/.netrc

Or

$HOME/.netrc

For Windows, the file is named _netrc and located in your home folder (see previous section for the definition of the home folder in Windows). You can access the file via

%HOME%\_netrc

Or if HOME environment is not defined, use

%HOMEDRIVE%%HOMEPATH%\_netrc

To save your password for a remote repository , add a line like below to netrc file.

machine git.yoursite.com login yourusername password yourgitpassword

EOL Handling

The test practice for end of line (EOL) character handling for text file is to follow below recommendation:

For Unix, Linux, OSX or OS those native line ending being LF

core.autocrlf=input
core.safecrlf=true

For Windows and OS those native line ending being CRLF

core.autocrlf=true
core.safecrlf=true

Please refer to next section for instructions of change those values.

Change Configuration

Basic configuration includes user name, email and EOL handling. You can follow any one of below method to change the configuration.

Warning
EOL handling configuration used in the following subsections are examples for Windows platform. Please substitute with the right values for your OS platform that were discussed in the EOL Handling section.
Edit .gitconfig file

Open or create .gitconfig file in your home directory (Windows user see ..) and add (or edit) below line to the file.

[user]
        name = Your Name
        email = youremail@domain.com
[core]
       autocrlf = true
       safecrlf = true
Using command line utility

Run below commands:

git config --global user.name "Your Name"
git config --global user.email youremail@domain.com
git config --global core.autocrlf true # true for CRLF native EOL, input for LF native EOL 
git config --global core.safecrlf true

Use below commands to check the current values

git config --global --get user.name
git config --global --get user.email
git config --global --get core.autocrlf
git config --global --get core.safecrlf
EGit

Please refer to Configuration section of EGit Bootstrap page.

TortoiseGit

Right click on any folder in Windows Explorer. Select context menu TortoiseGit->Settings
TortoiseGit-Settings
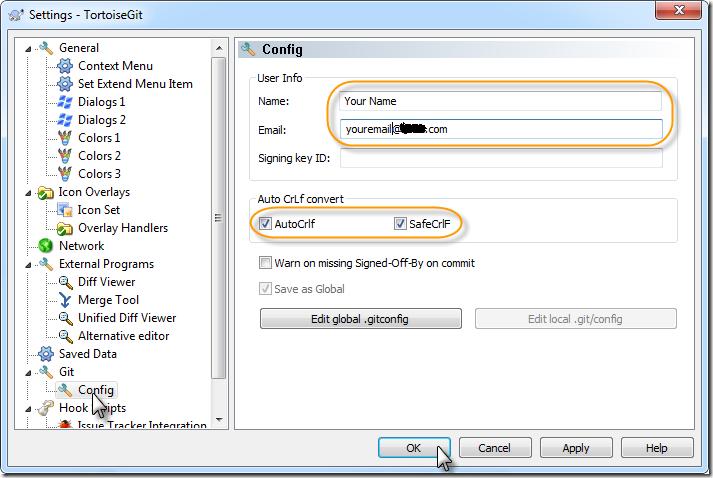
Select Git->Config and enter the value according to the screenshot below:
TortoiseGit-Config

Clone Repository

Command line utility

Change your current directory to where you want your cloned repository and issue below command.

git clone http://git.yoursite.com/Project1.git

This will create a Project1 sub directory that contains cloned repository.

EGit

Please refer to Clone Repository section of EGit Bootstrap page.

TortoiseGit

In Windows Explorer, right click on the folder you want your cloned repository to be located. Select "Git clone..." context menu item. Enter the repository Url and click "OK" button.
TortoiseGit-Clone

Further Reading

  • Git Tutorial, it also come with Git command line utility, just type:
git help tutorial

Tuesday, January 17, 2012

Install Eclipse and Commonly Used Plugin

Note: Recently I wrote a series development bootstrap documents for our new Java project using Eclipse as primary development tool. Maybe useful to others.

Install Eclipse

Download installer from Eclipse Indigo (3.7.x) Packages (3.7.1 as at the time of writing) page http://www.eclipse.org/downloads/ (or http://wiki.eclipse.org/Older_Versions_Of_Eclipse if 3.7 is no longer the latest version). Eclipse comes with multiple favors for various development purposes. But each favor can again be customized to include any functions by installing additional plugins. For Java development, you can start from one of three recommended packages:

  • Eclipse IDE for Java Developers – This is the most recommended download. After installing this package, you need to install Web Tools feature and upgrade Git integration.
  • Eclipse IDE for Java EE Developers – This package come with a lot of useful tools for enterprise Java development including Web Tools. What’s missing is the Git integration that you must install later.
  • Eclipse Classic – This option is only for power users. You are on your own if you prefer to use this package. You must install additional plugins before it can be effectively used for your day to day development tasks. Web Tools, XML Tools, Mylyn and Maven are required by most of projects.

Download the correct file according to your operating system and bit version and install it to wherever you want. In Windows, you just unzip it in the directory of your choice.

Tip: How to determine whether a computer is running a 32-bit version or 64-bit version of the Windows operating system

Run Eclipse

To run eclipse,

  • Windows - run eclipse.exe found in the unzipped eclipse directory. You may want to create a shortcut in a convenient location.
  • Linux - run ./eclipse &
  • Mac - run Eclipse.app

The first time Eclipse opens, it'll prompt you for a workspace directory. If you are a beginner, please accept the default.

Keep Eclipse Updated

Upon your first startup of Eclipse, please update the software by selected menu item “Help->Check for Updates”. And follow the instructions to update Eclipse and plugins. You should also run the update periodically.

eclipse-update

Access Feature Window

Many Eclipse feature are not directly accessible by default. Plugins have feature windows may not show automatically after installation. From time to time, users of Eclipse need to manually show the feature windows. Instruction below illustrates how to show a feature window.

  1. Use menu item "Window->Show View". If the feature window is listed in the sub menu, select that. Otherwise, select "Other..." sub menu item to popup "Show View" dialog.
    eclipse-show-view-menu
  2. In the "Show View" dialog, you can find the feature window in the tree. But it is much faster to type in a word of the feature window in the filter text box, e.g. "task" in the picture below.
    eclipse-show-view
  3. Select the window and click OK button.

Eclipse Plugins

Please read the general installation instructions section first and install plugins in the order listed in this document.

General Installation Instructions

Most of Eclipse plugins can be installed using menu item “Help->Install New Software…”.

eclipse-install-menu

Install dialog windows pops up. Enter a URL in “Work with:” combo box (or selected one if already exist in the dropdown list). Then select the software you want to install. Click Next and follow the instructions. You can use filter text box and other checkboxes and buttons to help you find and select the software to be installed.

eclipse-install-dialog

Click “Next” after selecting the software to be installed, accept license/s and restart Eclipse when prompted to do so.
When you are installing multiple plugins, you can also select all the software from different features and install them once to avoid multiple restart.

Eclipse sometimes popup a security warning during installation. That is because some plugins we use are not signed. Please click OK to continue installation.

eclipse-security-warning

Feature Window
The feature window of newly installed plugin may not display by default. In most of time, you'll need to manually show the the feature window.

Web Tools Platform

The Eclipse Web Tools Platform (WTP) extends the Eclipse platform with tools for developing Web and Java EE applications. It includes source and graphical editors for a variety of languages, wizards and built-in applications to simplify development, and tools and APIs to support deploying, running, and testing apps. If you have used Eclipse IDE for Java EE Developers package, the Web Tools Platform is already installed so you can skip this section. Otherwise, open the install dialog window, select “Indigo - http://download.eclipse.org/releases/indigo” in the “Work with” combo box. Then select below software and complete the installation.

  • Web, XML, Java EE and OSGi Enterprise Development
    • Eclipse Java EE Developer Tools
    • Eclipse Java Web Developer Tools
    • Eclipse Web Developer Tools
    • Eclipse XSL Developer Tools
    • JavaScript Development Tools
    • JavaServer Faces Tools (JSF) Project
    • JAX-WS DOM Tools
    • JAX-WS Tools
    • JST Server Adapters
    • JST Server Adapters Extensions
    • JST Server UI
    • WST Server Adapters

Git Integration (EGit)

EGit is an Eclipse Team provider for the Git version control system. Open install dialog window, enter "http://download.eclipse.org/egit/updates" in the “Work with” combo box and press enter. Then select below software and complete the installation.

  • Eclipse Git Team Provider
    • Eclipse EGit
    • EGit Mylyn
  • JGit
    • Eclipse JGit

Maven Integration (m2e)

The m2e provide a first-class Apache Maven support in the Eclipse IDE, making it easier to edit Maven's pom.xml, run a build from the IDE and much more. Open install dialog window, enter “http://download.jboss.org/jbosstools/updates/m2eclipse-wtp/” in the “Work with” combo box and press enter key. Then select below software and complete the installation.

  • Maven Integration for Eclipse
    • m2e - Maven Integration for Eclipse
    • m2e - slf4j over logback logging (Optional)
  • Maven Integration for WTP
    • Maven Integration for WTP

Note: If you have used Eclipse IDE for Java Developers package, the core of m2e is already installed but you still need to install WTP integration.

Thursday, January 12, 2012

Svn2Svn – Copy and Sync Between SVN Repositories

The Mission

Break a huge and poorly organized Subversion repository into a number of small, project oriented repositories.

The Challenge

  1. The repository is so large that generating a dump is taking forever.
  2. There are build systems connecting to the current repository.
  3. During the migration process, we should not stop developer from committing their code.

Traditional Tools

The typical solution is to use traditional subversion dump and filter tools. But that doesn’t work for us due the the size of the repository. Dump takes long time and filter into many many small repositories take weeks. In the mean time, developer need to continue to commit and build system must continue to work. Hence we need a solution that enable us to migrate gradually.

Replay Tool

The solution to the problem is a subversion replay tool. The idea is to pull the revision history of a subtree in source repository, replay it back to the destination repository. New commits to the source repository can be incrementally copied over. It should work like svnsync but for a subtree instead of entire repository, and you don’t have to start from revision zero. The benefits of such tool are:

  1. Projects can be moved one by one or a few at a time.
  2. Each project can move according to its own agenda.
  3. The build system can switch to new repository first while developers still committing to old repository.

Why Another Svn2Svn

There was already such a tool available at http://svn2svn.codeplex.com. That tool has its own advantages but doesn’t work for us because it

  1. Does not preserve the author and date/time of the revision.
  2. Does not copy node properties, e.g. svn:ignore, svn:external.
  3. Does not handle copied or moved nodes. This is particularly an issue for tags.
  4. Fails at a few other edge cases

So I set out to completely redesign and rewrite another Svn2Svn.

The New Svn2Svn

The new Svn2Svn is now born. It runs on Windows platform and is based on SharpSvn. It fulfills above requirement and has below features.

  • Support both command line and Windows UI.
  • Copies change sets from one SVN repository to another.
  • Supports non-rooted path (subtree) for both source and/or destination.
  • Doesn't require source and destination to have same path.
  • Copies node properties so that properties like svn:ignore and svn:external are preserved in the destination repository.
  • Copies revision properties so that author and date/time of revisions are preserved in destination repository. [1]
  • Doesn't require to starting from zero revision.
  • Can optionally specify a source revision range.
  • Supports move and copy in addition to add/delete/modify. A tag in source is copied as a true tag in destination with accurate copy from path and revision.
  • Able to gracefully stop the process in the middle.
  • It automatically resumes from a previously stopped session, either manually stopped or due to an error.
  • Able to auto-resync and incrementally copy over new change sets from source. [1]
  • Properly handle rename that only changes the case of letter. E.g, rename “Abc” to “abc”.
  • Intuitive to use. When fails, you get detailed error message.
  • In most of time, you are able to resume from failure by just deleting your working directory and restart with the same parameters.

Note [1] features require destination repository support revision property editing.

Download and Installation

Svn2Svn is a 32 bit .Net application packed in a zip file that contains both Windows UI and command line executable. The distribution is bundled with SharpSvn DLLs, so you can easily unzip to any folder you like and run one of two executable files. They run on 64bit system as 32bit applications.

To obtain Svn2Svn, downloaded latest version from http://code.google.com/p/kennethxublogsource/downloads/list.

Windows UI

image

Command Line

C:\Svn2Svn>Svn2SvnConsole.exe
Usage:
        Svn2SvnConsole.exe [options] sourceUri destinationUri workingDir
options:
        -R:from:to Copy revisions specified by from and to.
        -R:start   Copy revisions from specified start to HEAD.
        -R::end    Copy revisions from 0 to specified end.
        -X         Do not copy any revision property.
        -X:[ADR]   Do not copy one or more revision properties. e.g.:
                   -X:D  - Do not copy date/time revision property.
                   -X:AD - Do not copy author and date/time revision property.
        -I         Ignore all none fatal errors. Only log them.
        -V         Log every revision.
        -V+        Log every revision and node.

Using Svn2Svn

Svn2Svn UI and command line provides same set of features, we’ll use command line as example to show the usage.

Destination Repository Configuration

Some important features of Svn2Svn requires the destination repository to allow revision property editing. Very often you’ll get below error message:

Error Processing Revision
Repository has not been enabled to accept revision propchanges;
ask the administrator to create a pre-revprop-change hook

This is because the destination repository wasn’t configured to allow revision property editing. To enable revision property editing, you need to provide pre-revprop-change hook. And make sure the hook will allow the user who is running this tool to edit any property. The Svn2Svn zip package also enclosed a file named “pre-revprop-change.exe” in the “Misc” folder. It is very useful if you use a local repository as your destination. The pre-revprop-change.exe allows free editing of revision properties by anybody and it prevents a DOS window from being popped up on every commit, which happens when you use a .bat or .cmd based hook.

Typical Usage

The tool is quite intuitive to use. In addition to source and destination URI which are very obvious, it needs a working directory to manipulate the local changes. Below is a typical example:

Svn2SvnConsole.exe http://sourcerepo/svn/project1 http://destinationrepo/svn/ c:\temp\project1

This command can be scheduled to run many times. Every time it runs, it will bring new commits from source to destination. Be careful that you should not make conflicting changes in the destination repository if you intended to run the same command again to bring new commits from source.

Specify Revision Range

If you’ll need to specify (or have to specify) the range of revisions to copy over to destination, use the –r option. You can specify both starting and ending revisions or just one of them. If only one is specified, the other will take a default value. The default value is zero for the starting revision and HEAD for the ending revision. Command below copies from revision zero to revision 678.

Svn2SvnConsole.exe http://sourcerepo/svn/project1 http://destinationrepo/svn/ c:\temp\project1 –r::678

Control Copy of Revision Property

There are times that you have no control over the destination repository so you cannot change the revision property. In this case, you’ll need to disable copying of the revision property by using –X option.

You can also selectively disable copying of specific revision property by using option –X:  immediately followed by any combination of letter A, D and R. For example, option  –X:AD disables copying of author and date/time.

  • A – Author, svn:author
  • D – Date/time, svn:date
  • R – Source revision, svn2svn:revision

Logging Control

Use –V option to have the tool output message for every revision copied. Use -V+ option to further output the detail process information of each node.

Error Handling

Whenever a non-fatal error occurs, the tool will display a title followed by the error message and give you options to fail, retry, ignore or ignore all.

  • Fail will stop the process, print out the full stack trace. Command line tool will exit with non-zero error code.
  • Retry will attempt the same operation again.
  • Ignore will leave the problem as is and move on to next operation.
  • Ignore all will do the same as “ignore” and additionally have the tool automatically ignore all further errors with same title.

The command line tool also support option –I to automatically ignore all non-fatal errors. Non-fatal errors are those errors related only to a specific revision or node.

Interrupting the Process

Windows UI tool turns the “Copy” button into “Stop” button when the copy is in progress. You can click on Stop button to stop the process. Command line utility supports Ctrl-C to stop the process, as soon as you press Ctrl-C during the copy process, the tool will ask you if you want to gracefully stop the process or fail immediately. You should almost always gracefully stop the process by pressing ‘Y’ key. The fail immediate option is provided only for the cases when the graceful stop doesn’t work. If that happens, press ‘X’ key to exit immediately. If you pressed Ctrl-C by mistake, you can press any key other than ‘X’ and ‘Y’ to resume copy process.

How Svn2Svn Works

Every time you run Svn2Svn, it goes through below steps:

  1. Determine the highest revision of the source if end revision wasn’t specified.
  2. Create the destination directory if one doesn’t already exist in repository.
  3. If working directory doesn’t exist, check out the destination to the working directory. Otherwise, do svn cleanup, then revert back pending changes if any and delete all non versioned files and directories, finally do svn update.
  4. Scan through revision history of destination to detect the previous copy information by retrieving the revision property named “svn2svn:revision”. And establish the source revision to destination revision mapping for anything that was previously copied.
  5. Loop through source revisions a hundred at a time to avoid http timeout. Skip through those already copied revisions using revision map collected in the previous step.
  6. If this is the first time copying, i.e. there is no revision mapping discovered in step 4, the tool exports the nodes of first source revision, including their properties, to working directory and commit the changes to destination.
  7. For each subsequent revisions, looping through all node in the change set and perform below operation:
    1. Delete, modify or add/copy the node.
    2. Delete existing properties from node and copy the node properties from source.
  8. If a letter case change only renamed is detected, the add/copy operations are all deferred. The tool executes an additional commit followed by deferred add/copy operations.
  9. When every nodes are done, commit to the destination repository with the same message from source.
  10. Edit the revision repository according the the options specified. You typically want the author and date/time copied over.
  11. Add “svn2svn:revision” property to the destination revision, with value being the source revision number. This information is essential to incremental copy the change set.
  12. Go back to step 6 and repeat the process until the end revision is reached.

Misc. Tools

The Svn2Svn package also include addition stuff in Misc sub directory. One is the “pre-revprop-change.exe” file to enable the revision property editing that we have discussed. Another is a zip of empty Subversion 1.6 repository for you to easily create an clean 1.6 repository. Simply unzip it to any directory you choose.

Known Issues and Workarounds

Authentication

At this moment, the tool doesn’t have build in authentication mechanism. The work around is to use any other SVN client to authentication with the source and/or target and make sure you save the password. I have used TortoiseSVN and standard SVN command line client with success. If somebody have a patch to enable authentication, I’m more then happy to put it in but I don’t have a need for this.

Error in Working Directory

From time to time, you may encounter errors. Some of them are due to a bug in this tool, a bug in SVN itself or nature of case-sensitively difference between Windows vs. SVN repo. But so far most of problems can be solved by simply deleting the working directory (delete the directory itself, not just the content in it), and rerunning the same command again.